
Ah, squeaks. They are the bane of a single-reed player’s existence. Whether you’ve been playing for 10 minutes or 10 years, every musician encounters squeaking at some point. We all come across the age-old question: how can we prevent squeaking? Below are some tips and tricks that appear to have helped a number of students in their anti-squeak journeys.
What is a squeak? In my teaching experience, I most often hear two kinds of squeaks: one sounds almost like a note, just high and unpleasant. This squeak is often simply a mispitch of the note, which can usually be solved by looking at tension, fingering, or embouchure / air. Occasionally, you need to check your reed.
The second kind is much higher pitched – it sounds almost like a fire alarm beep or higher in pitch. This is usually attributed to a reed problem, rather than an issue with tension or fingering. Most commonly, the reed needs to be dampened more before playing.
This list is no means the only reasons why you could be experiencing squeaks, but it is the most common issues that I come across. No matter the ‘kind’ of squeak, run through these options to try to solve the issue!
1. Tension

If you feel stressed or tensed up while playing the clarinet, it will almost always result in a few squeaks. Unfortunately, squeaking then causes more stress, which causes more squeaks!
When we are stressed, we tend to tense up our shoulders. This, in turn, tenses up our neck and jaw. This stress also leads to grinding our teeth – or, in a clarinettist’s sense, biting down on the reed. This ‘biting’ is often what causes squeaks.
One suggestion that I always apply to my own playing is an active reminder to “lower my shoulders”. This helps my whole upper body to relax, allowing my reed to vibrate freely, which dramatically reduces squeaking and allows me to have more control on my instrument.
2. Fingering
Before we jump on the “I have a terrible reed” bandwagon, we should also double check our fingering is correct. Clarinets have about 17-23 keys, while saxophones have approximately 22-24 keys. For a singular note, we are looking at a maximum of 9 keys being pushed in most instances – that’s a lot of extra keys that we could accidentally bump!
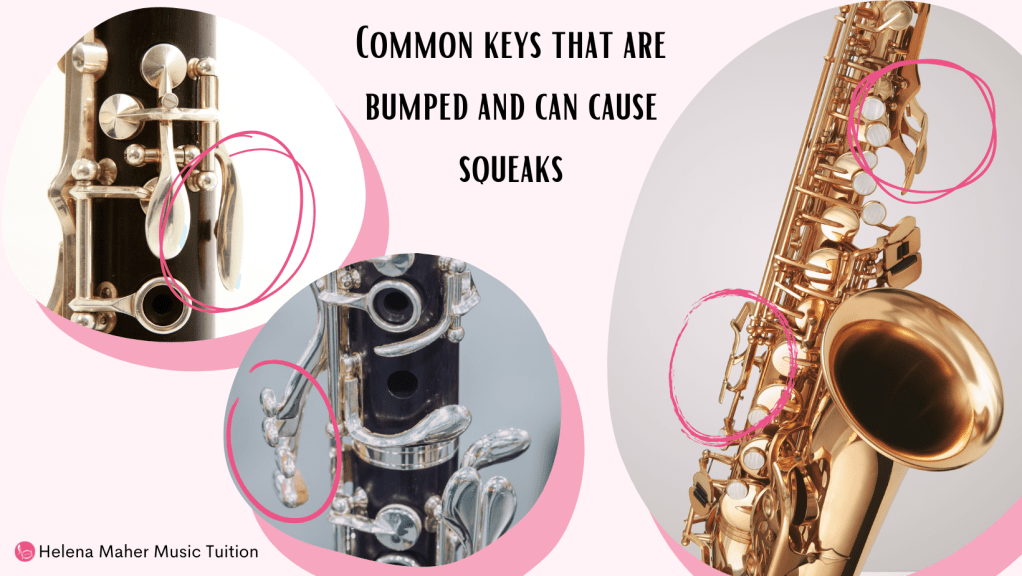
Above is an image of some of the most common keys that students bump. These bumps happen with the edge of your finger or your palm, and is caused by resting your hand against them while reaching around for other keys. Make sure your hand position is nice and round to avoid hitting these keys, and see if this helps with avoiding squeaks!
3. Embouchure and Air

Experiment with how much or little of the mouthpiece is in your mouth. You may find that by having more or less of the mouthpiece in your mouth, you eliminate the issue with squeaking.
Another issue you may experience is blowing too much air through your instrument. This becomes especially noticeable when you are learning to play loudly for the first time.
Remind yourself to maintain good embouchure technique – your top teeth sitting on top of the mouthpiece, and your mouth in a nice “oo” shape, and imagine your stream of air is that of blowing through a paper straw into a glass of water that is on the ground in front of you.
4. Reeds

Finally, the issue very well could be with your reed. There is a number of reed issues that could be causing your squeaking, especially if it is on a reed that has worked well for you in the past.
- Your reed may be too dry
- This may become especially obvious when the weather dramatically changes across seasons.
- Make sure that you have sufficiently moistened the reed, either in your mouth or by soaking it in a glass of water.
- Your reed may be worn out
- Have you been playing on this reed regularly for quite some time? If your squeaks have been slowly increasing, and you can’t work out why, it is possible that your reed’s life has come to an end. Try breaking in a new reed and see if this helps with your issue.
- Have you been playing on this reed regularly for quite some time? If your squeaks have been slowly increasing, and you can’t work out why, it is possible that your reed’s life has come to an end. Try breaking in a new reed and see if this helps with your issue.
- Your reed may be brand new
- While less common, there is a possibility of excess squeaking on a new reed. Try to slowly break in the reed by playing on it for only a few minutes at a time initially, and building this up.
- While less common, there is a possibility of excess squeaking on a new reed. Try to slowly break in the reed by playing on it for only a few minutes at a time initially, and building this up.
- Your reed may be too hard or soft
- If you have been playing on a softer reed (for example, a size 2 reed) for quite some time, you may be due to upgrade to the next level up (2.5).
- If you have just recently upgraded reed sizes, it could be just an issue as your embouchure adjusts and gains strength. Persist with good technique, you’ve got this!
- Your reed may be damaged
- Double check that your reed is in good condition – if your reed is damaged, you will have less control over the notes on your instrument. Check for chips or splits in the reed, and replace it if needed.
- Double check that your reed is in good condition – if your reed is damaged, you will have less control over the notes on your instrument. Check for chips or splits in the reed, and replace it if needed.
- Your reed may be imbalanced
- Reeds, unfortunately, don’t come perfect. They often need finishing and balancing to get the best out of them. If all else fails, make sure to let me know – I can help you to balance your reed in our next lesson!
Reeds, unfortunately, don’t come perfect. They often need finishing and balancing to get the best out of them. If all else fails, make sure to let me know – I can help you to balance your reed in our next lesson!
- Reeds, unfortunately, don’t come perfect. They often need finishing and balancing to get the best out of them. If all else fails, make sure to let me know – I can help you to balance your reed in our next lesson!
